
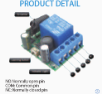
Product Information
| Type | 5301 |
|---|---|
| Product Name | RELAY REMOTE CONTROL SWITCH |
| Working Voltage | DC 5V~30V |
| Input/Output Voltage | DC 5V~30V / 1~250V |
| Output Type | Passive output / Potential-free contacts |
| Quiescent Current | < 5mA |
| Max Current | 10A |
| RF Frequency | 433MHz |
| Working Temperature | -30~+80 °C |
| Receiving Sensitivity | >97dbm |
| Amount of Storage Remote Controls | 20 pieces |
| Support Encoding | 1527 Leaning code, 2262 fixed code |
| RF Operating Mode | ASK superheterodyne wireless reception |
| Receiving Range | Open space is more than 50 meters |
| Remote Operating Mode | Momentary Mode / Toggle Mode / Latched Mode / Delay Mode |
Receiver Terminals:
- NO: Normally open pin
- COM: Common pin
- NC: Normally closed pin
Customer Service
If there are any questions about the products, please contact us first. We will do our best to solve your problem. Thank you.
Contact Information:Email: linktrol@icloud.com, WA: +8615812381273
Operating Modes & Programming
General Warnings
- Usually, the receiver and transmitter are paired at the factory. If not, reprogram them.
- Reset before changing the operating mode.
- After reset, all remote controls will no longer work.
- Replace the battery in time when the remote transmitter voltage is low for stronger signal transmission.
- Slightly stretch the antenna on the receiver for better signal reception.
- The remote transmitter needs 2 or more buttons to set up in latched mode.
- The output type is passive output / potential-free contacts
Momentary Mode
Operation: Press and hold the button, the relay turns on; release the button, the relay turns off.
How to Program:
- Press the learning button (on the receiver) 1 time. The indicator LED on the receiver lights up.
- Press one button on the remote transmitter. The indicator LED on the receiver flashes several times and then lights down. Success
Toggle Mode
Operation: Press button "A", the relay turns on; press button "A" again, the relay turns off.
How to Program:
- Press the learning button (on the receiver) 2 times. The indicator LED on the receiver lights up.
- Press one button on the remote transmitter. The indicator LED on the receiver flashes several times and then lights down. Success.
Latched Mode
Operation: Press button "A", the relay turns on; press button "B", the relay turns off
How to Program:
- Press the learning button (on the receiver) 3 times. The indicator LED on the receiver lights up.
- Press button "A" on the remote transmitter. The indicator LED on the receiver flashes several times and then lights up.
- Press button "B" on the remote transmitter. The indicator LED on the receiver flashes several times and then lights down. Success.
Delay Mode
Operation: Press and hold a button, the relay turns on; release the button, the relay turns off after 5 seconds (10/15/20 seconds).
How to Program:
- Press the learning button (on the receiver) 4 times (or 5/6/7 times). The indicator LED on the receiver lights up.
- Press one button on the remote transmitter. The indicator LED on the receiver flashes several times and then lights down. Success
Reset
Press the learning button (on the receiver) 8 times. The indicator LED on the receiver flashes several times and then lights down. Success.
Troubleshooting
If the receiver and transmitter cannot operate normally, try to solve the problem by following the steps below:
- Check if the batteries are depleted. The indicator LED on the remote transmitter does not light up or is dimly lit.
- Check if your receiver is wired correctly. It is important to ensure the wiring is correct.
- Reprogram the receiver and transmitter. Usually, this can solve many problems.
- If the problem still remains, please contact us in time. We will do our best to solve your problem